Monday, May 31, 2010

Have a cold one!


In browsing through some very cool shops around town, which include Blue Banana Market in Kensington and Outer Layer on Queen St, I've across this very interesting brand of kitchen gadgets and tools from a company called Fred & Friends. Granted, a lot of them are very gimmicky and maybe not that useful, but still, I'm hooked and would love to fill my kitchen with them!


I dropped by Blue Banana this week to pick up one item in particular after having seen it elsewhere, and this was a little treat for Matt (ok, maybe a little for me, too). We have both been enjoying iced coffees from Starbucks on these past few hot days (when you need a caffeine fix, but not necessary a hot one!), but if you take your time drinking them, the ice melts into them and dilutes the coffee flavour! So, Fred has come out with a genius idea and created something called Cool Beans. 


This is basically an ice cube tray (not a new idea, by any means) shaped like coffee beans. You simply brew up a batch of your favourite blend of coffee, pour into the molds, and let freeze in your freezer. Then, the next time you make yourself an iced coffee, throw in a couple of the frozen coffee cubes, and you'll be sure to keep your beverage icy cold and still just as potent.  I've already made several batches, keeping them in a tupperware container in the freezer where they are readily available for our next cup.

If you head on over to the website, you'll also find some unique items for your home, for your office, and some fun party items. I realized that we already had a Fred item in our kitchen - the cheese slicer that looks like a mouse trap! And I also bought my brother a pizza slicer that looked like a rotary saw for Christmas last year. Don't know if he's used it yet, though...


Friday, May 28, 2010

It's all unravelling...


I finished up a project last summer (look at that wonderful tan!!), spending many hours knitting at the cottage and during our long car rides to and fro. Well, to be honest, I don't think I've actually put it on and worn it out. It's not that I don't like how it turned out, because I do. It's warm and cozy, but I just don't think it quite works for me. Of course, when I put it on to show people what I mean, they say it looks just fine, even cute. But I know myself that if I haven't worn it in a year, I'm probably not going to wear in the next year (it's kind of like cleaning out your closet...just pull the band aid off already, and forget about it!) But I love the yarn, and so I am very tempted to just unravel the entire thing and start fresh on a new project. And I know that once I pull out that first row, there's no going back!

The original pattern is from Americo, a really great little knitting shop on Queens St. They have some really fabulous yarns, and a lot of really creative and unique patterns that the owner designs and knits to display in her store (the catch, of course, is that you have to buy the yarn in order to get the pattern). The picture to the right is what the original pattern looked like finished.

It was actually really neat how you knit it: first, you start by knitting a long rectangle, which you then folded lengthwise to create the arms and the back (stitching together equal seams on each side to create the sleeve). Then, using circular needles, you pick up and knit in a giant circle, over and over again, to create the wrap portion around the front and back. It did take some time to work it up, but it was pretty cool to see how it all came together finally. I may not be describing it very well, but you might be able to see what I mean from my finished sweater in the picture. I used two different colours of grey to create a striped pattern, thicker on the back, thinner along the front. It was a great colour combination, too, so I know I'll like whatever it turns into next.

Now, don't try to talk me out of it - I've pretty much made up my mind. Besides, what fun is knitting a project that you're not going to wear? All that time plus the lovely yarn would just sit in my closet. So, I'll shed a single tear as I unravel it all, and then move on to something else that I know I'll enjoy knitting and wearing. Now, the questions is, what?!

Thursday, May 27, 2010

The Knitting Machine

Wouldn't it be awesome if the Knitting Machine were a cross between a Time Machine and a Knitter? Well, it kind of is, because working on a knitting machine means you can knit at super sonic speeds!! It would also be a great title of a novel, like a sci-fi novel...I'm working on it...


Let me share with you what I mean. For those of you unfamiliar with anything other than two hands and a pair of knitting needles, a knitting machine is a stationary tool that has many needles that knits a piece of fabric in no time, by simply moving the 'carriage' back and forth (the picture hopefully shows you kind of how it works, otherwise, I've since discovered several instructional videos at youtube.com).

There are some very complex machines, and some very simple ones, and the knitting machine I borrowed from my mother-in-law is the latter that simply clamps onto a table. After a bit of practice, I finally got the hang of knitting basic rectangles to turn in scarves and wraps. Well, in tidying up the apartment, Matt thought it was time to give it back, so I finished up two last projects. Actually, they were two wraps that were meant for Erin for Christmas, but time got the better of me and I never got a chance to finish them up (so we just gave Erin the balls of yarn with the promise that they would one day get finished).

Well, with the ease of this machine, I was able to finish two of them in just one day! This wool is really soft and wonderful, so a wrap is great thing to make out of it (in total, I think I've already made 4 out of the same yarn, in different colour variations). And since the pattern is really just a long rectangle, knitting it with the machine is a cinch - back and forth, back and forth. I did attempt to make these back in December, but you know how sometimes when you try to make something in a hurry, just everything seems to go wrong? Well, that's what happened, and with this machine, if a few stitches fall off the needles, its almost just as easy (and fast) to rip everything out and start again...but also very frustrating! This happened quite a few times in December, so I think I just threw in the towel. And even this time I was working under a bit of a time pressure, but not enough of one that things went wrong. In fact, these two scarves worked out perfectly!

I'm tempted to invest (they can be several thousands of dollars!) in a more high tech knitting machine in the future, but that won't happen until I have a knitting/sewing room to keep it in (and possibly win the lottery...). For now, Diane can have her machine back, and I'll continue knitting away the old fashioned way.

Wednesday, May 26, 2010

Fat Friday - Stockyards


A while back, probably some time well before Christmas, Matt had heard of a really great little hole in the wall that served up some delicious ribs, fried chicken, and pulled pork sandwiches - The Stockyards. The ribs are only served on Friday through Sunday, and you better get there early to get yours (ribs are served after 5pm). The first time we went, we were not aware of the fact that they sell out quickly, so we settled for the pulled pork sandwich and fried chicken and promised we'd go back again soon.

Well, soon turned out to be about 5 months later, and this time, we got wise and planned our meal for Sunday at 5 (about 2 weeks ago, that is...). You'd think we would have beaten the crowds, but by the time we arrived, there was already a line-up out the door. But the ribs, they were hot and ready! So we ordered up a half rack with a side of fries, and completed the meal with two lemonades - oh, and a pulled pork sandwich, because they are just so darn tasty! 

The Stockyards doesn't have much room for eating in, in fact, not much room for standing in line, either, as I think they cater much more to the take-out crowds. So after we got our order, we headed outside and dined on a lovely little bench in the shade just down the street. This was the first time we had the ribs, and they were good, but I think we both agreed that the pulled pork is well work going back for, probably one of the best we've found in the city thus far (and we've tried a few!).

It's inspired us, in fact, to have our own pulled pork this week.


Thursday, May 20, 2010

Chicken Taco Salad

(a photo with fresh flowers that Matt brought home that night...)

Another great weeknight salad that's quick to whip up is this very simple Chicken Taco Salad - all the great taste of a flavourful chicken taco on a bed of greens. Plus, you can really vary the variety of vegetables by choosing whatever ingredients you'd like.

We like this salad because it makes us feel like we're enjoying a healthier dinner with loads of vegetables and very minimal fats (aside from the cheese, of course), and the only cooking required is to boil the chicken for 10 minutes or so. Then you chop into pieces, let it marinade in the dressing mix for about 30 minutes, assemble the salad and you're good to go! So, you're entire meal is pretty much ready in about 45 minutes, and there are hardly any dishes to clean. Plus, by adding the chicken to the salad, it really does make it a filling meal, so you're not hungry again in an hour or so (although, that is about the time we dig into our candy cupboard for an evening snack...).  

I've also made this salad by cooking up a batch of ground beef with the a package of taco seasonings, and again, instead of putting them into shells or wraps, simply spread over the salad, top with your choice(s) of cheese, sour cream, salsa, or guacamole. While it's also a nice variation, I do like the marinade this recipe uses for the chicken a lot better.

Ingredients

4 cups water
3/4 pound chicken tenderloins
1/4 cup minced fresh cilantro
1/4 cup finely chopped red onion
2 tablespoons lime juice
2 tablespoons olive oil
1/2 teaspoon hot pepper sauce
1/4 teaspoon grated lime peel
1/4 teaspoon taco seasoning
2 cups chopped lettuce
1 plum tomato, finely chopped
1/2 cup shredded cheddar cheese
2 tablespoons chopped dry roasted peanuts


Directions
  1. In a large nonstick skillet, bring water to a boil. Reduce heat; add chicken. Poach, uncovered, for 8-10 minutes or until no longer pink. Drain and cool slightly. Cut chicken into cubes.
  2. In a small bowl, combine the cilantro, onion, lime juice, oil, pepper sauce, lime peel, taco seasoning and chicken. Cover and refrigerate for 1 hour.
  3. Just before serving, toss the chicken mixture with the lettuce, tomato, cheese and peanuts. Yield: 2 servings.

Wednesday, May 19, 2010

Vanilla Yogurt Lime Bread


Can you tell I'm a little obsessed with lime as of late? It's also because I'm slightly obsessed with my zester... But when I came across a recipe for lemon yogurt bread, well, it looked too darn tasty not to try it out. Of course, I made some substitutions on the lemon front... (I'm also on a little bit of bread making kick, so this was right up my alley. Michael Smith of the Food Network Show Chef at Home had a really great episode the other day that included fresh bread AND cheddar beer soup... sounds like a meal to me.)

I guess technically this loaf falls more into the cake category; it has a little bit of sweetness to it, and I probably wouldn't recommend toasting it, but I certainly recommend warming it up for a few seconds in the microwave and slathering with butter (or serving fresh out of the oven). I made this loaf for the Mother's Day Brunch we were catered,, but now that the loaf is long gone, I think I need to bake up another.

The original recipe called for lemon yogurt with a bit of lemon zest, but all I had in my fridge was vanilla yogurt and a few limes (hey, Michael Smith is inspiring me to cook with what you have, what can I say?). With a little bit of improvising, the loaf turned out really moist and delicious, and definitely one I'd make again (probably this week to take to the cottage for the long weekend, in fact...). I think mixing up the yogurt flavour is a great way to create a different loaf each and every time. Of course, once I find one that I enjoy, I tend to keep making it, but I'm sure I'll try something different soon...once the lime fad has passed. I bet any combination of flavoured yogurt would be really tasty...

Ingredients

1-1/2 cups all-purpose flour
3/4 cup sugar
1/2 teaspoon salt
1/2 teaspoon baking soda
1/4 teaspoon baking powder
1 egg
1 cup (8 ounces) vanilla yogurt
1/3 cup canola oil
1 tablespoon lime juice
1 tablespoon lime zest

Directions

1. In a large bowl, combine the flour, sugar, salt, baking soda and baking powder. In another bowl, combine the egg, yogurt, oil and lemon juice. Stir into dry ingredients just until moistened.

2. Pour into an 8-in. x 4-in. loaf pan coated with cooking spray. Bake at 325° for 45-50 minutes or until a toothpick inserted near the center comes out clean. Cool for 10 minutes before removing from pan to a wire rack. Yield: 1 loaf (12 slices).

Easy, right?

Tuesday, May 18, 2010

Charlie the Giraffe


I think this might actually be my cutest creation yet. Introducing...Charlie the Giraffe!

I have been anxious to share this new member of the BBB Zoo with you for a while now. My sister-in-law, Erin, had asked me a while back if I would knit something for her to give to her friend's son, Charlie, for his birthday. I was delighted to, and suggested this cute giraffe, as I had been wanting to try this one out.  I finished it a bit before Easter, but since Erin had yet to send it off, I was holding off on the post... I didn't want to ruin the surprise, after all! I haven't heard the feedback yet, but I hope Charlie was a hit.  

I'm learning that these stuffed animals are really very similar in design (the arms/legs and body, at least), but what gives them their unique characteristics are the little finishing touches, and colour, of course. This one is a vibrant yellow and orange, and I think it would be hard to mistake it for anything other than a giraffe... especially when you see the spots and the pom-pom mane along it's back, and the adorable horns atop his head! (Is it so wrong of me that I love this little guy?!?)  There were certainly a lot of little pieces in involved in putting this guy together, a lot of spots to knit and then stitch on, and several pom-poms for the mane and tail. But when it all comes together, and you stitch on the eyes and mouth, well, it really felt like I created something special. It was almost hard to say goodbye...

On a completely side note, I also learned the importance of good lighting when taking photos. I love playing with my camera, finding the perfect angle for the right shot, creating a lasting image to encapsulate my object, and I think I might actually be getting the hang of it. This one was taken with some indirect sunlight, and I'm amazed at how well it turned out! Other of my photos have been a bit of a flop, and I didn't feel like the photo gave you the true impression of what the stuffed toy looked like. But I felt this photo really did capture the essence of Charlie.

Monday, May 17, 2010

Pretzels!


While at home Friday afternoon, I was inspired to whip up a batch of fresh pretzels. I can't tell you why or what might have given me this idea, and I've never actually made them before, but I do know that Matt enjoys, so I thought, why not? Plus, who doesn't love the smell of yeast rising and fresh bread baking in the oven?!

So, off to the computer to my reliable recipe resource, allrecipes.com, to find the easiest recipe for pretzels with hopefully the ingredients I already had in my cupboard (nothing worse than having your heart set on a recipe and you don't have the ingredients you need!). Turns out, there aren't that many ingredients . Along with the yeast, I even had coarse Sea Salt, which I substituted for the kosher salt, a full unopened container...what luck!

Baking something new for the first time really is kind of exciting, at least for me. It tests my culinary skills and always teaches me something in the end. I pulled out the mixing bowl (I can't wait until I have a kitchen large enough to keep my KitchenAid on the counter instead of hidden away in a cupboard...) and away we go!

Ingredients:

1 1/2 teaspoons active dry yeast
3/4 cup warm water (110 degrees F/45degrees C)
1/2 teaspoon white sugar
1/4 teaspoon salt
2 cups bread flour
1 egg, beaten
2 tablespoons kosher salt

Directions:
  1. In a small bowl, dissolve yeast in warm water. Let stand until creamy, about 10 minutes.
  2. In a large bowl, combine yeast mixture, sugar, salt and 1 cup flour; beat well. Beat in the remaining flour, 1/2 cup at a time, until a stiff dough is formed. Place dough in a lightly oiled bowl, cover, and let rise until doubled in volume.
  3. Preheat oven to 450 degrees F (230 degrees C). Lightly grease a cookie sheet.
  4. Turn dough out onto a lightly floured surface and divide into 12 pieces. Roll pieces out into long sticks and form into pretzel shape. Place pretzels on prepared baking sheet. Brush with beaten egg and sprinkle with kosher salt.
  5. Bake in preheated oven for 12 to 15 minutes, until golden brown.

I actually ended up making 2 batches this time round. I had two different yeasts in the cupboard, and the first batch didn't turn out that great (a little on the dry side...). But instead of tossing it away, I continued as planned, forming them into the traditional pretzels while mixing up a second batch with the correct yeast. Plus, I also learned from the first batch that you might need a bit more water than the directions call for, so the second batch turned out a lot moister and easier to work with than the first.

The hardest part for me was waiting for the dough to rise! It was supposed to double in size before you started working with the dough, but I was anxious and just eye-balled it. But I soon learned after baking them that they continue to rise in the oven. So next time, I'll be a little bit more patient and wait for them to rise on their own. Regardless, they were still delicious! And Matt was pleasantly surprised to come home and find a bag full of homemade pretzels...mostly for him. I, of course, had to sample one or two to make sure that they were edible, after all...


Fat Friday - Milagro!


There is this little Mexican Cantina literally steps outside our condo building that looks ever-so-charming, but for one reason or another, we had yet to venture inside. We have glanced at the menu numerous times on our way past, seeing some really tasty entrees listed that surely we would enjoy. Reviews have been great, and friends of ours who have tried it said they really liked it. It is a little on the pricey side, but we always say, "We should go there some day."

Well that day, my friends, was last Monday, and what finally encouraged us to go was when we saw on the menu the Monday Enchilada Special. You get your choice of chicken or cheese enchilada with your choice of Mexican Beer for the low, low price of $12.95. And to start, as any good Mexican restaurant should, fresh tortilla chips and salsa to whet your appetite and enjoy while you wait for your meal. And that didn't take long at all! Of course, that could have been because it was a little slow that Monday night, and hence the special! Being in the theatre district, Monday nights are dark (no shows are airing), and so I think restaurants might struggle to get patrons through their doors. So, in hindsight, our reservations probably weren't really that necessary...


And since it was Enchilda Monday, enchiladas is what we enjoyed! We ordered two different versions  of the chicken variety so that we could swap halfway; Matt opted for the Tacuba made with green tomatoes and chile sauce, while I went for the Rojas with a tomato and chipotle salsa. Both had some very nice heat to them, and the three enchiladas, paired with rice and black beans, were more than enough to fill our bellies. And they were brought to our table so quickly that we were barely through the chips and salsa! Overall, a really great Monday night dinner. Other nights have different specials on them, but really, Monday night is your best deal.

I've made enchiladas in the past, but my recipe has a creamy chicken mixture of cream cheese and salsa inside the tortillas, so I was a little surprised that Milagro's had just shredded chicken wrapped inside the tortilla with the salsa on the outside. Probably a better, and lower fat, version than the ones I make, actually... Plus, they do the dishes...

Friday, May 14, 2010

Change is good!

I've only been doing this blogging thing for a little over 6 months now, and in the process of reading other blogs, I have stumbled across elements that I think would be good to have on my own blog. A lot is trial and error, what isn't really in life, so some things may only be around for a day or so, others may stick around a bit longer.

You might have already noticed some of these changes, such as the running blog list to the left, and the new edition of "Today's Little Bit of Awesomeness". I got this idea when I was reading the Little Log House Chronicles and saw that she posted "What's for dinner tonight?" and thought this was a genius idea! (Melissa, I hope you don't mind I borrowed the idea for my blog...). It's a great little way to update your blog with a quick little note when you may not have the time to do a full post.

Well, my latest edition, if you look closely towards the top of the page, there are a few extra headings in blue. These are extra pages of information that I thought I'd try out. When I saw that you could add these pages, I did some day dreaming of what I thought might be good to post. I came to a the idea of creating a sort of virtual Recipe Box of all the cooking and baking ideas I've posted about. This serves as a handy little reference for both myself and you, if you're ever going back to look for a particular recipe.

I'll be keeping this extra page updated with all my recipes, so do check it out! All my previous posts are up and running. And feel free to share with me what you think is working and what's not. I'm always open to some constructive criticism...


Thursday, May 13, 2010

A Mother's Day Brunch

My friends, I know I've been rather tardy on the posts lately, and for that I hope you'll forgive me. It's not for a lack of things to post about, because I certainly have many things to share with you, but for the moment, I'll chalk it up to long days at the "office"...


But for today's post, I hope you'll indulge me a moment and let me share with you just a few wonderful little thoughts (I know, a little late...) of just how amazing a women my mother is. Yes, Mother's Day is only celebrated one day of the year, but I'm sure all of you have either first hand experience, or at least can understand, just how hard being a mother is.

Growing up, my mom was always around to offer advice and guidance, whip up cookies and cakes for bake sales, and of course be there to care for a scraped knee. She kept us organized as a family, keeping track of who needed to be where and when. She planned our family vacations and trips, she cooked us some fantastic meals, and she didn't put up with any crap from us three kids...

But Marg, Mom, you went above and beyond.

I remember the gingerbread houses you used to bake for the school, and the will power it generated in us (feared into us, perhaps... ) to see it sit in the living room with the implied DO NOT TOUCH. Instead, we saw it sit there, covered with tasty sweets and treats, knowing full well that some lucky raffle winner at school would be taking it home. On the up side, there generally was some left over candy that we could munch on... And you always baked us homemade birthday cakes with a quarter hidden for a lucky kid to find (I remember one time when no one found one, and you weren't sure if someone swallowed it, or you just forgot to put on in there!).

I have to give you all the credit for my musical and crafty inclinations. You encouraged us to express ourselves through music - the singing, the piano playing, and band practices - and without that, I'm not sure I'd be the person I am today. I made many great friends in band and went on some amazing trips, and even though I was technically a Band Geek, I never really felt that way. I know it was your encouragement and continued ushering to keep up with piano lessons that has given me the gift and appreciation of music (hence our regular outings to the TSO). I hope one day to do the same for my children. And let's face it, the cooking and baking, seeing you in the kitchen every day, that must be where I get some of my creative genius. For all that and much, much more, Mom, there are never enough Thank You cards to send to tell you just who much you mean to me.

In honour of that, what better treat than to give your mom a day off and feed her. We invited Mom and Dad down to the condo, and Matt and I whipped up a lovely little Saturday brunch for her to enjoy, in honour of her special day. It may not look like much, some scrambled eggs, pemeal bacon, and potato pancakes (not from scratch, I'm afraid), plus some fruit on the side, but I think it was a great meal for my mom to share with her kids.

Mom, I hope you enjoyed the meal; I owe that and so much more all to you.

Friday, May 07, 2010

Finally...successful ravioli!!

I guess practice really does make a difference. I think I've pretty much got the hang of this pasta making thing, at least creating the perfect dough consistency and texture, even the rolling out part (which Matt also likes to help with), but I've always struggled with actually forming the pasta pockets.

Last night we made my goat cheese and chorizo ravioli again. All other times I've tried this before, I had problems with getting the pasta to stay together when cooking them. While they were still good, most of the filling comes out in the pasta water. But then I remembered a handy little tool that I had for making perogies, so last night's mission was to try that out. (If that failed, I also had an actual pasta stamps (circle and square), and that would have been my next one to try.)


With each and every attempt, I also tend to mix things up a bit. At first I was making the dough by hand, but this really took a lot of work! So I switched to using my KitchenAid Mixer and dough attachment...heck, that's what it's made for, so why not?! Once the dough has been made and chilled (I put it in the fridge for 15 minutes or so; this makes it a little less sticky to handle), you can start on your filling. Mine is just the standard onions, chorizo sausage (you take it out of the skin and break it down), and a bit of seasonings. The goat cheese goes in at the end when you're ready for the filling.

To make the pockets, I use my handy pasta roller (this is where two hands come in handy...), and roll the dough until I think it's thin enough. The base of the perogie maker is slightly bigger than it's upper jaws, so I used that to cut into circles. You then place  the dough in the little folding device (see picture), add filling, and fold. It pinches the sides together, and voila! Handy little raviolis! Next, you boil them in water for 8 - 10 minutes, then drain.


To finish off the dish, we melted together some olive oil, butter, and garlic in a the same frying pan as the filling, then sauteed the ravioli until golden brown. Top with a bit of Parmesan cheese, and folks, you've got yourself some ravioli!!

I wonder if I need to start thinking about another filling to go inside the pockets... but sometimes, why mess with a good thing? And my apologies if I've already posted about this pasta dish and you're sick of reading about it, but I felt it was the first time that they actually turned out they way they were supposed to. Thanks for bearing with me...


Thursday, May 06, 2010

Lovely Limeade


One of my recent purchases last weekend, after many weeks of looking, was a new zester (with a lovely green handle and all!). Several recipes I had cooked in the past had called for either the zest of a lemon or lime, and I've done my best with some of the graters I had at home, but I knew I really needed to get myself a professional zester.

And what a difference!! I immediately had to test it out, and since we had some lemons and limes in our fridge left over from the wedding, I was inspired to whip up a jug of limeade. I can't believe how lovely the new zester is (I also can't believe how excited I am over a new zester.... ). But with a few tricks I picked up from watching Chef Michael on Chef at Home, the jug of limeade was very delicious. I'm happy to share them with you, too.

So, with the new zester in hand, limes in the fridge, sugar in the cupboard (and water in the tap...), I was set to get to work on creating my new signature drink (I'm sure it will be a party favourite, especially if its served over ice with a splash of rye...). I was just about to start squeezing the juice out of the limes when I remembered that I actually had a juicer, part of the mandolin slicing tool I received from my friend Darlene as a shower gift. A few twists on the juicer, toss, and repeat, and that sure did beat trying to squeeze the juice out by hand.

The two tricks I learned to make a great limeade: 1) it's actually the flavour in the zest that makes it taste so good, and  2) the secret for adding your sugar is to heat it first in water to make a simple syrup. This eliminates the grittiness of the sugar crystals and blends the sugar throughout. For my recipe, I threw everything into a blender, added some ice cubes, and hit the go button. For those of you who want to try it out at home, enjoy the recipe below:


Recipe:

the zest of 3 limes
the juice of 3 limes
3/4 cup sugar
5-7 cups of water
ice cubes
Rye (optional)


Directions:
  1. Heat 3/4 cups of sugar in 2 cups of water over low-medium heat until sugar is dissolved.
  2. Meanwhile, add the zest and juice of the 3 limes to a blender, add remaining water and ice and blend.
  3. Once sugar is ready, add to mixture and blend a bit longer.
  4. Pour into glasses and enjoy!
I don't think we'll ever be going back to the frozen kind... and now that patio weather is soon upon us, I hope to be drinking a lot more of this.

Tuesday, May 04, 2010

Fat Friday - BQM

Yes, we're back to burgers... for this week's Fat Friday we expanded our list of burger joints and tried out the new BQM (Burger Shoppe Quality Meats) on Queen St. We had to compare it to our running favourite, Craft Burger, after all. And with only a small breakfast that morning (a croissant and coffee), plus a beer at the Jay's game (they lost... boo!), we were starving for some good food by about 4 that afternoon.

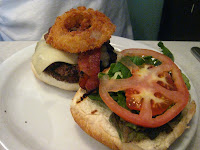
The BQM did not disappoint, especially with their speciality burgers. Matt's burger came equipped with a an onion ring  and bacon on top, plus the regular fixings of tomatoes and lettuce. The burger was done to perfection - medium rare, just the way we like it. I think in his opinion, it was comparable with Craft Burger...it is a neck and neck race. Maybe one thing that put them closer to the top was the available seating, but frankly, a burger to go is just as good.

For me, I ordered the burger with brie (of course), that ooey gooey goodness (doesn't it just look so yum?!).  But if I'm being honest, I might have to say that the brie didn't work terribly well on the burger. I think it added a bit of bitterness to the burger. But overall, it was a pretty darn good tasting burger. I often laugh that Matt and I will typically order the same thing when we go out, which of course makes it easy for the waitress. But for burgers, I like mine with pickles, Matt not so much, but the sweetheart he is, he usually donates his to my plate...

As usual, we had to order a side of both fries and onion rings (that's a true test for determining the goodness of a burger joint, in my opinion. The fries, well, they are hard to screw up, but the onion rings, that's the real test!). The waitress warned us that one order of either would be enough to share for the two of us, but we were stubborn and wanted to try both. Of course, she was right, and we couldn't finish them. And yes, the fries were just normal, but the onion rings were great! I think they used panko bread crumbs, which really made a big difference!

So, our verdict? Well, for starters, I think I've had enough of burgers for a while, but they have moved up our list. Plus, I think BQM has a lot of really great other menu items (the mac and cheese caught my eye, for one...I've been meaning to actually eat that at a restaurant to see how it compares to my gourmet Kraft Dinner...). This week we're switching to wings... a Matt favourite. Maybe the theme for the next little while will be on a search for the best wings in the neighbourhood...


Monday, May 03, 2010

It's the little things in life....

I'm sure some of you will agree that it really is the little things in life that make us the happiest. Like the current sunshine and warm weather...who can be upset by that?!?  Or afternoon naps.... ahhhh, nothing like afternoon naps, not that I had one this afternoon (honest!). Actually, on the subject of naps, when Matt and I were in the bookstore the other day, we picked up a book called the Book of Awesome - little snippets of things in life that really are awesome (naps were one of them...). While we stood reading several pages, laughing aloud and nodding our heads in agreement, about three more couples stopped to do exactly the same thing (we're kind of trendsetters that way...). Worth a borrow from the library, at the very least.


Other than naps, for me, a new ball of yarn can bring a certain giddiness to my step.  And I owe it all to the encouragement of my dear husband who suggested a trip to the yarn store this past Saturday (after our usual croissants and coffee, of course!). Can you believe I was reluctant to go at first, thinking that I already had too many projects on the go (more on that later...)? I did go looking for a particular yarn for a new project that I had in mind, but, sadly, they didn't carry it. Of course, I couldn't help but browse the isles to see what else they had. I finally landed on the above yarn - the colours were so bright and cheerful! It's all the colours of the rainbow, and the fun thing about these variegated yarns, is you really have no idea how they will knit up, so each row is kind of exciting on its own (for non-knitters, this must seem very dorky, like watching paint dry, but it really is more exciting than it sounds...). In any case, I have already changed project ideas about 4 times, and have finally settled on the perfect one now, something that will fully utilize the colours of the yarn.


This new project also gave me the perfect reason to try out a new knitting tool that my mother gave me (thank you again, Mom!) - a set of inter-changeable circular needles. This colourful set of needles range from the smallest to the biggest, and has various lengths of cording. This is great for working on all varieties of projects that require circular needles. They are coming in particularly handy for the my latest project - a baby sundress. I'll be sure to let you know how the colours unfold...

Besides the sundress, I've got a couple stuffed animals on the go. I have a reversible elephant/lion working slowly up, but that one seems to be on hold as of late (it's my bedside knitting project, which as been replaced with travel books on Italy at the moment...) But I am working on twin teddy bears in a lovely variegated yarn (perhaps my newest obsession with knitting as of late, can you tell...). They are my TV project for when we're watching the Jays game. I also have a car project (a shawl for Erin from LAST Christmas... We gave her the ball of yarn and said I would make it up, so I really should get on that...), but we haven't gone on too many long drives lately. But now that cottage season is shortly upon us, so I'll need to pick that up again, plus have a cottage project! Man, I'm going to be busy!

To give you a sneak peak of the bears, take a look below: From the ball of yarn to a cute little bear tush or two!


Can you start to see why knitting with variegated yarns can be an exciting process?? You almost couldn't tell that each of these is from the same ball of yarn, but indeed they are. They are close to being finished, so I'll be posting them shortly. Currently, they are not destined for anywhere in particular... They might just hang out with us around the condo for a bit.


Sunday, May 02, 2010

A lighter fare...

You might think that everything we eat fits into our Fat Friday category (I don't blame you if you do, since I tend to only blog about those meals), but we justify those meals by eating healthier during the week (and dragging our butts to the gym 5 days a week too...). A lot of our meals include a side salad (in place of other vegetables), which we then beef up with trail mix to make it a bit heartier, but once a week, we try to include at least one meal that is just a salad. But your probably know that salad can be kind of  blah just by itself, so we have discovered a couple really great twists to traditional greens with dressings. I thought I would share one with you here.


This recipe came from a magazine I picked up last summer, Cooking For 2 by Taste Of Home. We get most of our recipes and ideas from this magazine, and I have since been searching the racks at book stores and convenience stores to find another edition - no such luck! If you ever come across a new edition, please do let me know where to find it, because it really is the perfect cooking recipe if you're just cooking for 2 people (its like they knew what they were doing when they created it...). Taste Of Home puts out a lot of different magazines (which I also like, and include some great recipes, but they just are not the same...), so I wonder if this is either a yearly edition, or they simply stopped making it. In any case, the hunt still continues...


The salad we enjoyed the other night was a Lime Chicken on Fruited Greens, the one on the cover, in fact (their photo is probably more appetizing than mine...I'm still working on presentation skills. So far, Matt doesn't deduct any points for my lack thereof...). We pick up a bag of already cut greens, and top it with chicken, blackberries, peach slices, goat cheese, and pine nuts. For the chicken, we marinade it in a lime and olive oil dressing with thyme, the same one we drizzle on the salad. Combined, its a really great flavour combination, and each bite is full of some wonderful tastes! Sometimes you need to make some substitutions to the ingredients, such as which fruits to include depending on the season. We couldn't locate any nectarines, so we picked up a can of sliced peaches (they're from the same family, right?). And since raspberries were a little expensive, we opted not to include them.

If you're ever looking to add of bit of flare to your salads in an effort to eat a bit healthier some nights,  I would really recommend this one (it's a favourite of ours, at least). It does not  take a lot of work, and you can really personalize to your own tastes and preferences by switching up the fruits and the cheese, and I think the lime dressing and marinade are a really nice substitute to some heavier dressings. And if you forget to take out the chicken from the freezer prior to cooking, I've found that boiling them (yes, I know, sounds weird, but it actually cooks them really quickly, and they stay moist and tender...) prior to adding the marinade, it helps speed up the process. Then I put the chicken on our indoor grill for a few minutes to complete the cooking, slice and serve, and voila - instant chicken and dinner.  

LinkWithin

Related Posts Plugin for WordPress, Blogger...