Wednesday, June 29, 2011

Recipe #22: Cacio e Pepe

Our Pasta Craze continues! This next recipe is a classic and easy Italian dish with very few ingredients. When served at restaurants, the pecorino cheese and the olive oil make this a stand-out tasty dish, but when you look at the recipe, you realize that anyone can cook this at home. I recommend serving with a tossed green salad, garlic bread, and of course, a glass of red wine.

This dish could not be any simpler, and chances are, you already have most of these ingredients at home in your cupboard. All it calls for is cheese and pepper (cacio e pepe) and a dash of olive oil or butter, then drizzle atop your favourite pasta. Almost any type of pasta will do; just see what you have in the cupboard.

INGREDIENTS

6 ounces of pasta (such as egg tagliolini, bucatini, or spaghetti)
1 tbsp fresh ground pepper
3 tbsp olive oil or butter
1 ¼ cup freshly grated pecorino cheese


DIRECTIONS

BRING 3 quarts water to a boil in a 5 quart pot. Season with salt; add pasta and cook, stirring occasionally, until about 2 minutes before tender. Drain, reserving 3/4 cups of the pasta cooking water.

M
EANWHILE, melt 2 tablespoons butter/olive oil in a large heavy skillet over medium heat. Add pepper and cook, swirling pan, until toasted, about 1 minute.

ADD 1/2 cup reserved pasta water to skillet and bring to a simmer. Add pasta and remaining butter. Remove pan from heat; add Pecorino, stirring and tossing until cheese melts, the sauce coats the pasta, and pasta is al dente. Add more pasta water if sauce seems dry.

Monday, June 27, 2011

To Make: Braided Knit Necklace

As the summer weather takes a turn for the better, with warm air breezes and sunny skies, my knitting needles have been unusually inactive. Where I once had three projects on the go, I have finished two of them and am slowly making my way through the last. All are warm weather sweaters, which will have to wait until fall to be worn, so the urgency isn’t quite there to finish them. (I will be posting about my finished two projects shortly, but I’m having issues with photos for those ones. I need to find just the right light and angle to show them off, but they are coming…eventually.)

In the meantime, I stumbled across this neat little knit necklace and think that this is going to be one of my summer projects. It was just the inspiration I needed to get back on track. I’ll be checking out my stash of yarns to see if I have something that will make this piece stunning…perhaps a grey or silver? Maybe even a two-toned one? These could even make nice Christmas gifts. I know THAT holiday is still a distance away, but crafty gifts take some planning!

And if I don't have any yarn at home, well, it doesn’t call for much, so why not splurge a little? It’s been weeks since I’ve picked out any new yarn….

Monday, June 20, 2011

Recipe #21: Bucatini All’Amatriciana

In the quest to eat less meat, pasta dishes are a great option. They are really easy to dress up with loads of vegetables and different sauces (and cheese), quick too cook up, and are very satisfying as a meal.  And if you’ve met me, you’ll know that I do enjoy my pasta. Sadly, not every occasion can be one for homemade pasta (although I have been thinking I need to make some again soon), but store-bought pasta works equally well, especially when you’re making your own sauce to go on top.

Ok, so this dish isn’t necessarily a meat-free dish, but it is one in a long line of pasta dishes that we have enjoyed lately. I’ve got plenty of recipes around the house, but Matt came across this one online and suggested we make it one Friday night. So, to cap off a busy week, we uncorked a bottle of red wine, settled in at the kitchen table, and enjoyed our Bucatini All’Amatriciana while we chatted about our day.

I couldn’t find guanciale to make this dish a true Amatriciana, but the pancetta works just fine as a substitution, and if you’re really stuck, the bacon would be great, too (bacon makes everything better). The simple sauce is made with just 5 ingredients, not including the salt and pepper, and the crushed red pepper flakes give it a really nice kick of heat. For a quick meal, this is a great recipe to keep on file.

INGREDIENTS

2 tablespoons extra-virgin olive oil
4 ounces thinly sliced guanciale, pancetta, or chopped unsmoked bacon
1/2 teaspoon crushed red pepper flakes
1/2 teaspoon freshly ground black pepper
3/4 cup minced onion
2 cloves garlic, minced
1 28 ounce can peeled tomatoes with juices, crushed by hand
Kosher salt
12 ounces dried bucatini or spaghetti
1/4 cup finely grated Pecorino (about 1 ounce)

DIRECTIONS

HEAT oil in a large heavy skillet over medium heat. Add guanciale and sauté until crisp and golden, about 4 minutes. Add pepper flakes and black pepper; stir for 10 seconds. Add onion and garlic; cook, stirring often, until soft, about 8 minutes. Add tomatoes, reduce heat to low, and cook, stirring occasionally, until sauce thickens, 15-20 minutes.

MEANWHILE, bring a large pot of water to a boil. Season with salt; add the pasta and cook, stirring occasionally, until 2 minutes before al dente. Drain, reserving 1 cup of pasta cooking water.

ADD drained pasta to sauce in skillet and toss vigorously with tongs to coat. Add 1/2 cup of the reserved pasta water and cook until sauce coats pasta and pasta is al dente, about 2 minutes. (Add a little pasta water if sauce is too dry.) Stir in cheese and transfer pasta to warmed bowls

Wednesday, June 15, 2011

Recipe #20: Grilled Chickpea Burgers with Creamy Lemon Tahini Sauce


This recipe was my first foray into vegetarian cooking, if you don’t count meatless pastas or salads. Matt and I have been trying to make a conscious effort to eat less meat at home and instead opt for more nutritious vegetarian meals. Part of the reason is to try and eat healthier meals when we can, and part of it is also a feeling of social responsibility. A food critic I like, Mark Bittman, recently gave a talk: “What’s Wrong with what we Eat,” and it really made me think. If you have a few (or 20 minutes to spare, it might be worth a look.


On a similar note, there is a movie playing now called Forks Over Knives, which also delves into why we should eat less meat and more vegetables, and how out health is directly related to what we eat. I haven’t seen this one yet, but it is on my list.


But, back on topic now… the quest to eat more vegetarian meals has been both exciting and yet challenging. Finding recipes that we think we’d enjoy plus introducing new ingredients is our goal, along with trying to expand our taste buds (and no, I still will not eat mushrooms!). Chickpeas have never really entered our diet, so I thought this one would be a great one to start with.

I really love the excitement of a new recipe, be it for cooking or baking. I love finding all the ingredients, then putting them all together one by one. Sometimes I get over eager and forget to read the recipe thoroughly, but things usually work out in the end. I was careful to read this recipe, though, so no mistakes were made, and after putting everything together, grilling on our indoor griddle, these were really delicious! They were light and fresh and the tahini sauce mixed with lemon juice really added some nice flavour. And surprisingly, this dish was really inexpensive, since two cans of chickpeas cost like 3 dollars. That’s a whole lot cheaper than a chicken breast, for example, and this recipe ended up making 6 burgers, so we froze 4 and enjoyed them later. This one is in our repertoire for sure!

INGREDIENTS

1/4 cup extra-virgin olive oil; more for brushing
4 medium cloves garlic, sliced
2 tsp. ground cumin
4 or 5 six-inch pitas
2 15.5-oz. cans chickpeas, drained and rinsed
5 Tbs. tahini
1/4 cup fresh lemon juice (from 1 medium lemon)
1 large egg
Kosher salt
2 Tbs. chopped fresh flat-leaf parsley
2 Tbs. chopped fresh cilantro
1/4 English cucumber, thinly sliced)
1 medium tomato, thinly sliced
Harissa (or other hot sauce; optional)

DIRECTIONS

PREPARE a high gas or charcoal grill fire or indoor griddle.

HEAT the oil, garlic, and cumin in a small saucepan over medium-low heat until the garlic is soft but not brown, about 3 minutes. Set aside off the heat.

TEAR one of the pitas in half and toast in a toaster until golden-brown and crisp. In a food processor, grind the pita into fine crumbs; transfer the crumbs to a small bowl and measure them—you’ll need 1/2 cup. If necessary, toast and grind a second pita.
PUREE 1 can of the chickpeas with the oil mixture, 2 Tbs. of the tahini, 1 Tbs. of the lemon juice, the egg, and 3/4 tsp. salt until smooth. Add the remaining chickpeas and the pita crumbs, parsley, and cilantro; pulse until the chickpeas are coarsely chopped and the mixture is well blended.

PUT the remaining 3 Tbs. tahini in a small bowl and gradually whisk in 2 Tbs. water and the remaining 3 Tbs. lemon juice (the tahini will thicken at first and then smooth out).
Shape the chickpea mixture into 6 patties, each about 3/4 inch thick. Brush both sides of each with oil. Grill, covered, until heated through and nicely marked on both sides, 2 to 3 minutes per side.

CUT the remaining 3 pitas in half and heat briefly on the grill. Layer the burgers in the pitas with the sliced cucumber and tomatoes, drizzle with the tahini sauce and harissa (if using), and serve.

Friday, June 10, 2011

Fat Friday - M:Brgr

Wow, this post is loooong overdue. How long you might ask? Well, we dined at this restaurant some time back in March, and since that time, this restaurant has already closed up shop! We were not really surprised by this news, as this review will highlight, but since Matt and I were on a burger binge for Fat Fridays, we thought we owed it to our research to give it a try.

And it’s been ages since I’ve written about a Fat Friday…


If you’re not familiar with M:Brgr, it originally started in Montreal and has hence opened (and closed) a Toronto location on King St West, not too far from out house. We walked past it during the renovation stage, and after reading a few reviews on the place, we decided to give it a try. Their ‘gimmick’ was the $100 burger - two Kobe beef patties with bacon, grilled pear, foie gras, brie, fig jam, asparagus, Piave cheese, garlic-roasted ham, porcini mushrooms, honey truffle aioli and truffles.  


M:Brgr is all about the options. Their menu is quite extensive; you begin by choosing what type of paddy as your base: veggie, tuna, Kobe beef, or AAA beef. Step two: choose a bun: regular, whole wheat, or lettuce wrap. Next, you can add any number of common and unique ingredients to place atop your burger: various cheeses, a selection of sauces/mayos/relishes, and numerous vegetable toppings. The final step, for those inclined, is to add the “crazy expensive” toppings, which include a couple different truffles and Foie Gras.

There are other things on the menu that you can have besides burgers: tacos, sandwiches, salads, hot dogs, even macaroni and cheese, but with a name like M:Brgr, you got to try the burger. Matt and I decided on just basic burgers, choosing the AAA beef paddy on a regular bun, and adding cheese and bacon. We also ordered a side of fries to share (no onion rings on the menu…ahem….only onion strings. What’s that about? A true test of a good burger joint, for me, anyway, is how their onion rings taste. They lost major points with me on that one…). And the burger: how was it, you might ask? Well, service was a bit slow, but when it finally arrived, the burger was cooked well and tasted pretty good, but really it nor the fries were anything special. We had definitely eaten better.

The location itself is very large and spacious, almost too large for a burger joint. Previously, the spot has housed a number of other restaurants that never seemed to last long (another reason we weren’t surprised by the closure; I think the space might be cursed…), but just generally, M:Brgr was just overpriced for what you got. We were not in a hurry to go back any time soon. Looks like we won’t have the opportunity to.

Keep posted for a few more burger places to report on, including my new found favourite… I'll get to them, I promise.

Monday, June 06, 2011

Crafty Find: Explaining the Kindle to Dickens

Do any of you have a Kindle or other such e-book reader? Matt and I received a joint Kindle for this past Christmas from my parents (although, you should ask Matt about how that’s working out next time you should see him…). I love it! Right now I’m in the process of acquiring all the old classics (mainly because they are free), and since the Kindle houses more than 500 titles, I’m not in any danger of running out of things to read.

I was really excited to get the Kindle: no more heavy books to lug on vacation or the subway and instant access to new books at my fingertips. I will say the one thing I was disappointed in was the fact that the Toronto Library does not currently support e-books for Kindle, and that is a major flaw, but I’m hoping they will rectify this in the near future.

When I saw this post, not only did it catch my eye because of the Kindle aspect, but because it was just so darn clever! The idea behind it was a class assignment for an Art & Design school: “Explain something modern/internet based to someone who lived and died before 1900” (you can read more here).

I think the creativity behind this is astounding! What a great way to explain to Dickens what the Kindle is. What a great to explain what a Kindle is to anyone, actually. Good work, creative student!

Wednesday, June 01, 2011

Recipe #19: Never the Same Way Twice Muffins


Courtesy of foodnetwork.ca

It’s been muffin madness in our kitchen lately! As you know, I like to make some tasty and healthy muffins for breakfast for Matt and me. I generally whip up a batch or two on the weekend and store them in the freezer. These are a total time saver in the morning  

This recipe is from Michael Smith, and the appeal of this one is that you can add any or all of the below ingredients and come out with different muffins each and every time. Plus, there is a lot of nutritional value in these, too. I especially liked this recipe because I’m all about the bran these days, and any baking recipe where you can through that in automatically makes it feel healthier.

For this first round, I found soy milk powder and doubled it instead of using soy flour and milk powder, and used the bran instead of the wheat germ. And instead of using 1 cup of vegetable oil, I replaced with 1 cup of yogurt, bringing the total to 2 cups. I find I use that substitution a lot when a recipe calls for oil. I also like that you can use honey in place of sugar.


INGREDIENTS

Dry Ingredients
1 cup flour, whole wheat, spelt or white
1 cup oats, ground in food processor
1 tablespoon baking powder
2 tablespoons soy flour
2 tablespoons milk powder
2 tablespoons wheat germ or bran
1/2 teaspoon salt
1/2 teaspoon ground nutmeg
1/2 teaspoon cinnamon

Granola Flavour
1/2 cup oats
1/4 cup sunflower seeds or any other seed
1/4 cup slivered almonds or any other nut
1/4 cup raisins or any other dried fruit

Wet ingredients
4 eggs
1 cup yogurt, sour cream or milk
1 teaspoon vanilla
1 cup vegetable oil
1/4 cup honey or maple syrup

DIRECTIONS

PREHEAT your oven to 350°. Whisk together the dry ingredients in a large bowl. Add the granola ingredients and stir. Whisk together the wet ingredients in another bowl.

POUR the wet ingredients into the dry and stir a few times, just to combine. Try not to over mix or the muffins will toughen. Spoon the batter into a lightly oiled muffin pan. If you like you may line the pan with paper liners.

BAKE for 20 to 25 minutes, until you can insert a toothpick into a muffin and it comes out clean.

Monday, May 30, 2011

Crafty Find: Drunk Kitchen

This week’s crafty find is a video, and a funny one at that. I’ve seen this on a couple blogs lately and thought I should share it with you. If you can’t figure out the premise from the title, the host gets drunk and tries to cook in the kitchen. This episode features her making brunch. It made me laugh and laugh…and made me think that I should start making instructional videos… oh, if only I had the time to do everything I want to do in life. Ah, to dream….

Turns out the host has a series of cooking segments, so feel free to wander her youtube page to view the others. This one is my favourite so I thought I’d start with it. (It’s also my first time posting a video; turns out its super simple! a little trickier than I thought).

Note to viewers: Mild coarse language content.

Wednesday, May 25, 2011

Recipe #18: Pork Chops with Quinoa & Roasted Red Pepper Dressing

In lieu of not posting last week, here is recipe #18.


I’ve been reading a lot about quinoa lately and seeing lots of new recipes popping up on the internet, in bookstores, even in my own office lunchroom. After flipping through one book in particular at Chapters, Quinoa 365: The Super Food, I was excited to try out some of the recipes. This grain isn’t just for side dishes, no sir! It can be used ground up to bake with, too! I’m on the waiting list at the library for this book (only 112th in line), so when I get in my little hands, I might be baking up a storm.

Meanwhile, though, I thought I’d start small and try using quinoa as a nice side dish, and when I saw this recipe, I knew we had a winner. Not only did it have the recipe for the quinoa salad, but also the pork chops. With the added jalapeno pepper to give a little hint of heat, the mix of lime juice and roasted peppers really added a nice flavour to the salad, and I’d gladly eat this dish again. The quinoa cooked up very similarly to cous cous, so it would be easy to interchange these two grains in other recipes.

INGREDIENTS FOR QUINOA
1 Cup quinoa
1 Cup fresh or frozen corn kernels
1 large red pepper, roasted, seeded, and quartered
3 Tablespoon olive oil
2-3 Tablespoon freshly squeezed lime juice
3/4 Teaspoon salt, plus more for the tomatoes
1/2 Cup (tightly packed) chopped cilantro
1 jalapeno pepper, seeded and diced
1 Cup generous cherry tomatoes, halved or quartered
Chili-Scented Pork Chops

INGREDIENTS FOR PORK CHOPS
1 Tablespoon olive oil
2 Teaspoon chili powder
3/4 Teaspoon garlic powder
1/8 Teaspoon ground cinnamon
1/2 Teaspoon salt
4  pork loin chops, each about 1-inch thick
Vegetable oil, for frying

DIRECTIONS

BRING a large pot of water to a boil. Add quinoa and cook for 10 minutes. Add corn and continue cooking until quinoa is translucent and there is no tiny dot of uncooked starch in the centre, 1 to 3 more minutes. Pour quinoa and corn through a fine-meshed strainer. Run cold water over mixture to stop cooking process. Drain well and transfer mixture to a large bowl.

BLEND together in a mini chopper or food processor the red pepper, 2 tablespoons of olive oil, 2 tablespoons lime juice, and salt. Toss dressing, cilantro, and jalapeño into quinoa. Add more lime juice and salt to taste.

TOSS in a small bowl cherry tomatoes with remaining tablespoon of olive oil and sprinkle lightly with salt. Set aside.

MAKE in another small bowl a paste by stirring together olive oil, chili powder, garlic powder, cinnamon, and salt. Spread a thin layer of the paste on both sides of chops.

BRUSH a large skillet or grill pan lightly with vegetable oil and heat until sizzling hot. Cook chops over high heat until browned on bottom, about 1-1/2 minutes. Turn them over and brown second side. Reduce heat to low, cover pan, and cook chops for 4 minutes (if boneless) or 5 minutes (if bone-in). Turn chops over. Cover pan and cook until chops are cooked to taste, usually 4 to 5 additional minutes. Test for doneness by slicing into thickest part of chop.

ADD more lime juice to quinoa salad, if needed. Make a bed of quinoa salad on each plate. Set a chop on top. Spoon cherry tomatoes on the side.

Tuesday, May 24, 2011

Crafty Find: Long Exposure Photos

So, I took a small hiatus from blogging this past week. Part of it was due to the fact that Blogger has been uncooperative: any time I went to blog, the site was down and I was prevented from doing so. Part of it was the weather, too: grey and gloomy skies don’t exactly inspire. Part of it was lack of motivation, ideas, and general creative juices flowing. You can probably relate; sometimes, you just don’t want to.

But I’m back today after a very relaxing long weekend spent at the cottage, eating good food (way too much of it), visiting with family and friends, and enjoying nature and all it comes with (mosquitoes seemed to be the main attraction this year).

I wouldn’t necessarily say I have an eye for photography, but I do enjoy the beauty in other people’s work. Matt and I are still doing research into getting a new Digital SLR camera so that perhaps we can begin to take some great photos, but for the meantime, I have friends that share their photos online for all of us to browse, and there certainly is not a lack of great imagery on various websites. Half the fun of browsing the web is jumping from one site to another, never knowing what you might stumble on. And stumble I did, to a wonderful new blog: http://thisiscolossal.com/. On this site I found a collection of photos that were really interesting of long exposure air traffic. As my Crafty Find this week, I’m sharing them with you today.

If you enjoy taking or looking at photos, I hope you’ll enjoy these.


Friday, May 13, 2011

Recipe #17: Pueblo Green Chili


Mmm….chili. I’ve come to love this stuff - the red, the white, the green - it all tastes so good! It’s not just a Sunday night Football meal anymore at our house; it’s a great dish to cook up even when football season is over and baseball season has begun. And every bite of this green chili (a first for me) was delicious (PLEASE don’t judge by the photo; I neglected to take a photo of our version, and this one was from the recipe site, which doesn’t do it any justice. You’ll just have to take my word that it tasted good).

It was fun to go on the hunt for ingredients for this dish with Matt. We browsed the Mexican markets in Kensington looking for the different types of peppers, and when we couldn’t find the exact ones, we were adventurous and just bought which ones we could find. Very daring of us, no? I haven’t found a store yet that has heard of cubanelles, as the recipe lists, so we made do with some poblanos and jalapenos. (Update: I just did a quick Google search for a cubanelle, and turns out I had one in my hands at the market on Saturday but they went by a different name. Guess I’ll have to make this one again now that I know where to get the right peppers!)

I love trying new things, and roasting peppers was certainly a first. The roasting isn’t that difficult when you use the broiler in the oven, you just have to make sure to keep rotating the peppers. Once they are blackened, remove them from the oven and let them cool in a bowl covered with plastic wrap. The steam will help in removing the skins. I wondered if this step was necessary for poblanos, but everything I read tells me it is. When I made this dish again this weekend (the first time was well over a month ago now; slow posting time, I know), instead of roasting the peppers whole, I halved and seeded them before roasting and this eliminated the need to rotate them in the oven.

Next time I make this I think I’ll try using fresh tomatillos to get that really green chili color, and for an extra bit of texture, I might add in some brown rice or barley; I think that would be kind of nice.

INGREDIENTS
8 Mira Sol chilis (or 2 poblanos and 4 cubanelles)
2 jalapeño, seeded and finely chopped (for those who like it less spicy)
1 (28-ounce) can whole tomatoes packed in juice
4 tablespoons vegetable oil
1 large onion, finely diced (about 1 1/2 cups)
5 medium cloves garlic, grated on a microplane grater
2 teaspoons dried oregano
1 1/2 quarts chicken stock
1 pound pork shoulder or sirloin, cut into 1/2-inch chunks
3 tablespoons all-purpose flour
Salt

DIRECTIONS
ROAST chilis directly over a gas burner set on high heat or under your oven broiler until well charred on all sides (about 10-15 minutes total). Transfer to a paper bag or bowl, tightly seal the top, and let rest for 10 minutes. Peel the skins off the chilis and chop into 1/2- to 1/4-inch pieces. Set aside.

HEAT 1 tablespoon oil in a large pot over medium-high heat until shimmering. Add onions and cook, stirring occasionally softened, about 4 minutes. Add garlic and oregano and cook, stirring frequently until fragrant, about 1 minute. Add peppers, tomato mixture, chicken stock, and pork. Bring to a boil and then simmer for 2 hours.

REMOVE lid and continue to cook without lid until liquid is reduced to half, about 30 minutes. Meanwhile, heat remaining 3 tablespoons oil and flour in a small saucepan over medium heat. Cook, stirring constantly until light blond in color, about 3 minutes. Slowly whisk flour mixture into simmering chili. Continue to cook until desired texture is reached. Season to taste with salt. Cooked chili will keep in a sealed container in the refrigerator for up to 1 week.

Wednesday, May 11, 2011

Diane's Rectangular Sweater

If you know me, you'll know that I always have something on the go, and more often than not, more than one thing. It helps to be working a couple projects to keep the knitting fresh and interesting. Some projects can get a little tedious (knitting is very repetitive, after all), so if I have projects with different levels of complexity, it helps to keep my attention (I can also vary the project by television show/movie, depending on how much I actually need to pay attention).

As of late, I managed to cross off a number of projects that I have had on the go for a while. The first was the sweater for Matt, which I started way back in early spring of last year. Other projects were thrown in there at the same time, including one or two that probably got finished before his, so I had to make finishing his a priority.

Next in line was this project, a lovely mauve sweater for Diane, which was a gift for her birthday in January. I managed to finish it for Easter, a mere three months later, and yes, she knew it was coming. It was a pattern that I knew she was interested in knitting, so while she was visiting for her birthday, Matt and I suggested that she pick out the yarn and I would knit it for her. Being a knitter herself, she knew it would not be a fast process, but I had given myself the Easter weekend as my deadline to finish it.

This pattern was interesting in that the entire front and back were knit as one giant and long rectangle, with slits for armholes knit during the process, and sleeves knit separately and then attached. It was knit it stockinette stitch, which is the most basic of stitches, and because of this, I was able to knit it up quite quickly. I also chose to knit the sleeves at the same time, which gives them a good chance of ending up the same length (a good thing in sweaters, don’t you think?). But because of that, it meant I had to seam them together (something which I’m not terribly good at), which normally I try to avoid, but in this case, I thought it was a better idea. And after piecing everything together, I think it turned out quite nice. At least Diane likes it, and that’s what matters.

Next to post is my grey/teal moss stitch cardigan...

Monday, May 09, 2011

Crafty Find: Knitted Bicycle


This Crafty Find comes directly from my very own camera. As Matt and I strolled along Queen Street West one lovely Saturday afternoon, the window display of a clothing store, Comrags, caught my eye. But it wasn’t the clothes, though, it was the knitted bicycle! With my recent Crafty Finds of yarn bombing, this came pretty close to the real thing.

This window display brought visions of riding a bike through a sunny park, the scent of freshly cut grass wafting through the air. Perhaps we stop for an ice cream cone and people watch for a while. Doesn’t that sounds like the most ideal and relaxing weekend out there? And since the nice weather has finally arrived, I might just have to rent a bike and do just that one weekend.

The detail work on this is very impressive, and even though I’m pretty sure there's a real bike underneath, figuring out how to cover everything with must have taken a lot of measurements and careful calculations. That must have taken a lot of time and patience by a very talented knitter/artist. I wonder what I have at home to cover with knitting....? Must go home and investigate.

Wednesday, May 04, 2011

Recipe #16: Salty Chocolate & Caramel Butter Cookies

This challenge really has turned into a bit of a challenge. At first I thought, “one recipe a week, no sweat!” And it’s not that I have a lack of new recipes to try, but finding time to post them is another story. Some weeks I’ve cooked more than one new recipe, which helps on the weeks I don’t have time for a new one at all, but then writing them up sometimes seems more time consuming then actually making the meal! Which I know is not at all true. But trying to fit some writing into my day at work, well, that can be tough (it could also be because I am quite wordy….which takes more time.). In any case, that’s what I’ve signed on for and I’m not about to give up now.


Why not a recipe for something sweet for a change? For those who enjoy a little sweet/salty treat after dinner, these might be right up your alley. Even though this recipe didn’t turn out exactly right the first time (you’ll see why shortly), they were still very delicious, and it was very hard to eat just one.

After finding all the ingredients for this recipe (the flaky sea salt and espresso powder game me the run-around) I was ready to bake. Unfortunately, this recipe only uses a small amount of both the salt and espresso powder, but at least I’ll have these for next time. And where I made my mistake in baking was when buying the caramels. I didn’t have the recipe on hand when I picked them up (at the dollar store), so I didn’t boy the right amount, which meant the glaze was a bit runnier than it was supposed to. Soooo… when I put them into a container for storage, the glaze ran off and kind of created a big mess at the bottom of caramel goo… but then we realized that we could just pop the container into the microwave for a few seconds and just dip our cookies into the glaze. Delicious! The hint of salt on the sweet caramel was really enjoyable.

Since this recipe made quite a big batch, probably about 30 or so, we didn’t (not couldn’t, didn’t) eat them all; but instead of tossing them, I took all the remaining cookies, tossed them in my food processor, and now I have a great cookie crumble topping for ice cream!

INGREDIENTS

1 ¼ cups (20 tbsps) unsalted butter, softened
½ cups cocoa powder
1 tsp instant espresso powder
1 cup white sugar
2 large egg yolks
1 tbsps vanilla extract
1 ¼ cups flour
1 (14 ounce) bag soft caramel candies
¼ cup heavy cream
½ tsp flaky sea salt

DIRECTIONS

MELT 4 tbsp butter (1/4 cup), cocoa powder and espresso in a saucepan over medium heat; stir until mixture forms smooth paste then cool for 15 minutes.

MIX together remaining cup of butter, sugar, salt, and cooled cocoa mixture on medium-high speed until fluffy, about 1 minute. Add yolks and vanilla and mix until combined. Reduce speed to low, add flour in three additions, and mix until cohesive dough forms. Divide into three disks, wrap in plastic wrap, and refrigerate 1 hour.

PREHEAT oven to 375 degrees. Line 2 baking sheets with parchment paper.

ROLL each disk to 3/16-inch thickness. Using 2 ½-inch round cutter, cut out cookies and place 1 inch apart on prepared baking sheets. Bake until centers are just set, 10 to 12 minutes, switching and rotating sheets halfway through baking. Cool 5 minutes then transfer to wire rack to cool completely. Repeat with remaining dough.

MELT caramels and heavy cream in a saucepan over medium-low heat, stirring constantly. Top each cookie with heaping teaspoon of glaze and sprinkle with sea salt. Let cool 30 minutes.

Monday, May 02, 2011

Crafty Find: Eternal Plants


I stumbled across these very clever and beautifully done felted terrariums and loved the complex details but also the simple idea. Plus, I loved that these plants won’t wilt and fade away one day, much like my condo plants seem to. Seeing this first one, I had to do a quick Google search to see what other creations were out floating on the net and I wasn’t disappointed. I found a selection of lovely plants by some crafty people, and also got inspiration to make my own (knit and crochet patterns are readily available online.).

I especially like the old apothecary jars that house these plants; it’s a really nice charming way to display them. And yes, I even think the mushrooms would be something I might make. They are cute to look at, but just gross to eat…  

Wednesday, April 27, 2011

Recipe #15: Crunchy Pork Chops


This is yet another wonderful recipe from Cooking for Two (so far, I’ve been very impressed with these recipes. Which reminds me, I should probably put the other two versions on my wish list…). After cooking this dish, I realize I might have an instant favourite way to eat pork chops.

I’ve had shake ‘n bake chops before (and they were very tasty, Mom), but these are, by far, far superior. It’s the combination of fresh bread crumbs, cheese, and herbs that really make these chops tasty and crunchy. And don’t be tempted to just substitute the fresh bread crumbs with store bought ones; I know I was, but after tasting the freshness of these homemade ones, I might not go back. Ever!

The recipe below is perfect for two people, but can easily be increased to make 4 or more. To accompany the pork, I made roasted potatoes and sautéed green beans, both quick and easy side dishes. Oh, and don't forget to serve with a wedge or two of lemon. That adds a nice citrus touch to the pork chops (and green beans, if you feel like it).

INGREDIENTS

2 slices white sandwich bread
1 small shallot, minced
2 garlic cloves, minced
1 tbsp Parmesan
1 tbs fresh parsley, chopped
Pinch of dried thyme
7 tbsp flour
2 large egg whites
4 tsp Dijon
2 pork chops

DIRECTIONS

PULSE bread in food processor to make fine crumbs. Toss with shallot, garlic, oil, salt, and pepper and spread on a baking sheet. Bake at 350 degree, stirring occasionally until brown and dry, about 15 min. Remove and increase oven to 425 degrees.

LET bread crumbs cool before tossing with Parmesan, parsley, and thyme.

ADD ¼ flour in a shallow dish. Whisk together egg whites and Dijon and 3 tbsp flour in a second shallow dish. Pour prepared bread crumbs in a third shallow dish.

SPRAY a wire rack with cooking spray and set in a baking pan.

PAT pork chops dry and season with salt and pepper. Dredge in flour, coat in egg dip, then cover with a thick layer of crumbs, pressing the crumbs to stick better. Set on wire rack.

BAKE until centre is 140-145 degrees, about 15-20 minutes. Remove and let rest about 5 minutes.

VARIATION

For a different take on this recipe, before coating, place a slice of asiago cheese on the pork chop, then wrap with prosciutto. We are definitely trying this one next time.

Monday, April 25, 2011

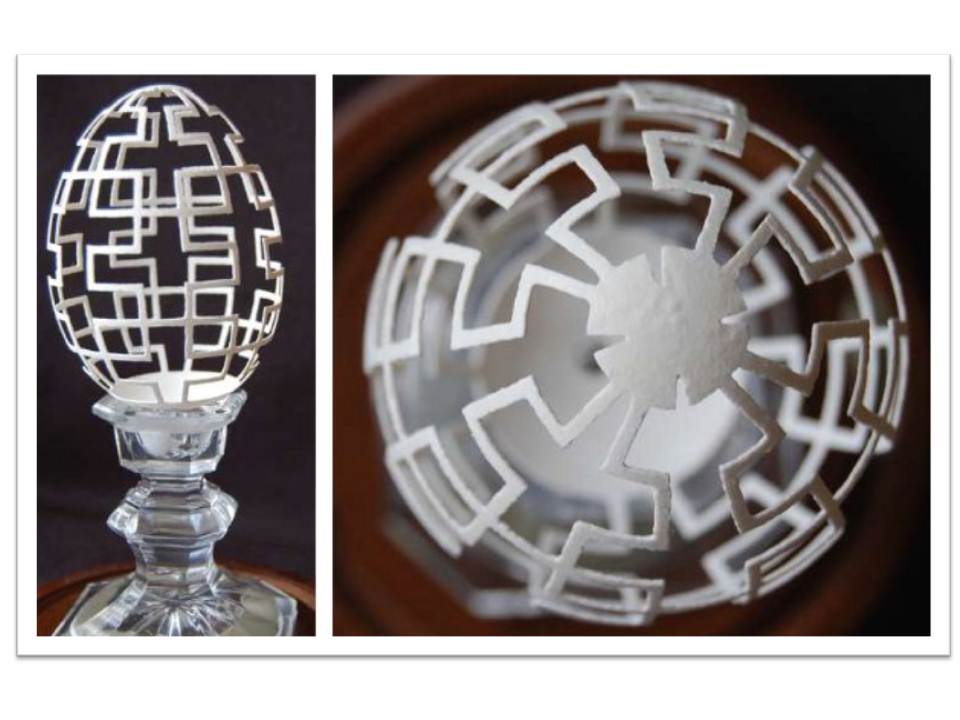
Crafty Find: Easter Eggs

Happy Easter! I thought it only fitting that I share a collection of uniquely decorated Easter Eggs today. These are not your average eggs just dipped in dye, no sir! These ones definitely took some time, a steady hand, and come creativity to complete. The designs range from embroidery, stencilling, drawings, and carvings, and are pretty darn amazing.


Speaking of eggs, the Easter Bunny must have hid our batch VERY well, because I haven’t found a single one….

LinkWithin

Related Posts Plugin for WordPress, Blogger...